Friday, May 29, 2009

Planking begins - Week 8

With Memorial Day this week, we were down to three days. Last week we drilled the hole for the propeller shaft, so this week we fit the motor mounts that will hold the engine in place. The first step is to make up a plywood "engine" the same dimensions as the real one. You can see ours in the photo below. This plywood template is a whole lot easier to move in and out of the boat than the real thing. In the picture the template is clamped to a wooden shaft and lined up just like the real one will be.


Here you see one of the engine beds being fit. The auxilliary floor timbers were cut away and beveled to fit the bottom (top in the picture) of the engine beds. The top edge is cut at an angle to match the orientation of the engine.


One of the reasons we're installing these engine beds now is because they are going to be bolted through the floor timbers. If we don't get them installed now, we'll have to drill through the planking, and the fewer holes through the planking the better.


Here you see the starboard side engine bed fit.


And the port side one is waiting for final fitting. Once it's fit, we can bolt them in and we'll be ready to fasten our garboard planks.


Fairing is continuing over on the port side.


Most of the material has been removed here at the forefoot, so we're getting really close.


And back aft, we've just got the inner keel and the adjacent floor timbers and sawn frames left to finalize.


Over on the starboard side we've had to fit a few patches where the rabbet ended up a little deeper than we wanted. It's important to have good contact between the back rabbet and the plank, so we're epoxying in a few pieces to fill these potential voids.
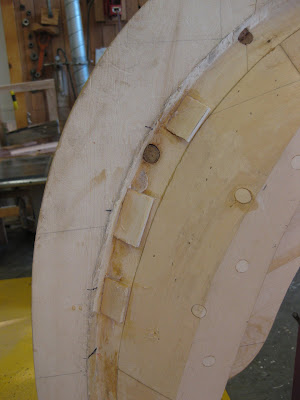


Once the epoxy has cured, we can plane down these pieces to match the surrounding rabbet. And with that complete, we're ready to begin planking.


There are a couple of steps before we're actually hanging planks. Since our first plank (the garboard) is defined along one edge by the rabbet, it's a good idea to make a pattern for that entire edge of the plank. Patterning a plank is what's know as spiling.

It takes a little time to make a full pattern for the rabbet edge, but a good fit will be worth the extra effort here. The trickiest section of the plank to pattern is here at the forefoot, where the plank is twisting into the rabbet. As mentioned last week, here the horizontal rabbet of the keel transitions into the vertical rabbet of the stem. We'll be asking the plank to take quite a twist as it bends. But we ask our 1/4" plywood pattern to do it first.


Not only does the garboard need to fit into the rabbet, but it also needs to fit against the cheek piece. After a little fitting, you can see here that the pattern fits tightly against the cheek piece. Hopefully the finished plank will do the same.


As we move aft, lets take a look at how we make our pattern. We start with a spiling batten, usually a piece of thin plywood.


There are may ways of scribing when making a pattern. The method we'll use here is called a compass scribe. Where the name comes from is pretty obvious from the next picture. To pattern the line (in this case the rabbet) use the compass to draw an arc on the spiling batten. The radius of the arc doesn't matter, so long as the arc fits on your batten and isn't so small that it becomes difficult to draw. One important thing to remember is not to change the radius on your compass while making your pattern. The reason for this will become evident in a minute.


Once you have arc every few inches defining the line your scribing, transfer the spiling batten to your stock. In most cases you'd go from the spiling batten directly to your planking stock, but since we're making a full pattern, we're still using patterning stock. With the point of the compass now on the arc drawn on the batten, make an arc on the pattern stock.


Now set the point of the compass at another point along the same arc on the spiling batten, and make another arc on your pattern, crossing the first. The point where these two arcs intersect is the point along the rabbet we scribed originally. Unless the radius on your compass has changed. Then who knows what you'll get.


Once this point is established, drive a nail and move on to the next point.


Once points have been establish the entire length of the rabbet, we use a batten to connect them and draw our line.


And now we have our rabbet line scribed onto our pattern. Now we just have to cut along the line and finish it off with a little planing.


Once the pattern is complete, it's time to make our plank. After milling the planking stock to the correct thickness, we lay the pattern on and transfer our lines. Since we took the time to make a full pattern along the rabbet, the bottom edge of the plank is easy enough to draw. We're simply tracing our pattern.


For the top edge of the plank, we established the edge of the plank at each of frames based on the plank lines we drew last week. So for the top edge, we'll use a batten to connect these point to get our line.


Once we've got the plank drawn, we cut it out and finish the edges with a plane.


And there you have it: our garboard plank. See what I mean about the shape of the plank? The far end which looked straight on the boat now has a definite curve to it.


With the plank ready for some final fitting, we first have to bend it to that shape at the forefoot. So it's off to the steam box for our plank. Thankfully the twist is only at the forward end of the plank, because as it turns out, our steam box isn't quite long enough for the whole plank.

After an hour of steaming, the plank took the bend without much difficulty. We've got it bent into position here and we didn't hear any of the telltale sounds of it breaking. We backed up the plank with a piece of thin plywood to help prevent the plank from splitting out and also to protect the soft red cedar from the clamps.


Underneath it looks pretty good.


Not too bad back aft either.


We'll leave the plank clamped like this over the weekend, so when we come back on Monday the plank will maintain the twist when we remove the clamps. We'll still have some fitting left to do, but we should have this one ready to fasten on before long.
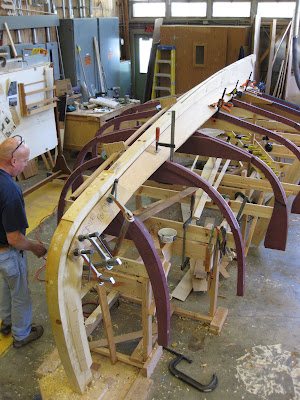


It's only the first of the twenty planks we'll be hanging before the hull is complete, but it's still quite exciting to see it on the boat.

Friday, May 22, 2009

Lining out the planks - Week 7

To start off the week we decided to take a break from fairing and bore the hole for the propeller shaft. The hole will go from the aft face of the sternpost through the deadwood and come out through the inner keel just forward of the floor timber at station 16. It's only about 24", but if you remember from a few weeks ago when we were assembling the backbone, there are two bolts through the deadwood that we'll have to avoid. When drilling for these bolts, we angled them so that we would leave enough room to bore the shaft between them. Now we'll find out if we left ourselves enough room.

To start we lay out where the shaft is going to go. Here we've drawn the centerline of the shaft on the side of the deadwood and marked where the shaft will exit through the sternpost.


Using a guide block similar to the ones we used when drilling for our keel bolts, we'll bore our hole using a barefoot auger that should make a nice straight hole.


The end of our guide block is cut to match the angle of the shaft. You can see that the centerline of the shaft matches perfectly with the centerline of the guide block lead hole. Once the guide is securely clamped to the sternpost, we're ready to go.


Even though we've taken our time making sure all our marks line up, it doesn't hurt to sight down the auger just to make sure everything looks as it should.


Now there's nothing left to do but start drilling.


Even though the hole is only about two feet long, it still takes a while since we're going through the end grain of the deadwood.


After we're about ten inches into the keel, we can remove the guide block. The hole we've got in the keel is more than enough to guide the auger the rest of the way.


On the inside of the boat, the auger came out right where we wanted it. But what about those bolts you ask? Well we did end up nicking them with the auger, but only very slightly. In the end we've got a nice clean hole through the bottom of our boat. It may sound counter intuitive, but we couldn't be more pleased.


With the shaft drilled, it's back to fairing. We're working on the port side cheek blocks now. To begin with we're concentrating on fairing the cheeks at each of the frames.


Once we can see that the plank will lay flat at the frames as in the picture below, we'll fair the cheeks between the frames and adjust our rabbet if necessary.


While we've still got some fairing to do over on the port side, the starboard side is ready for us to start lining out our planking. Regardless of whether you're building a carvel (like our catboat) or a lapstrake hull, before you can start planking you first have to line out all the planks. Lining out the planking means literally marking the top of each plank at the stem, the transom, and every frame between. To ensure a fair line we use battens so that we can easily see the plank lines.

The first batten is the top of the sheer strake. The sheer is one of the lofted lines of the boat, so we marked it on each of the frames back when we were assembling them. With a batten we connect these marks to verify that we have a nice fair line for our sheer.


Once the sheer has been established and we're satisfied that it's fair, we measure the girth at each of our stations. This is the distance from the rabbet to the sheer. Since the girth is greater at the middle of the hull than it is at either the transom or the stem, the planks will be widest at the middle and taper at both ends. Once you know the girth at each of the stations, it's possible to establish the taper based on these ratios, and the number of planks.

The second batten will mimic the sheer, tapering at each end. This batten is important because it establishes the lines of the topside planking (the next four or five planks most visible above the waterline).


With the sheer strake established with these two battens, we step back to see how it looks. Measuring the girth at each of the frames, we found that there wasn't much difference between the biggest and smallest, so the sheer plank could have been a uniform width over it's whole length, but we opted to taper it at each end. Why? Because it looks good. Sometimes it's as simple as that.


Each of the next planks parallels the bottom of the sheer, though these topside planks are a little narrower than the sheer strake. This is because the top of the sheer strake will be covered by a guard 1 1/2" wide. Once the guard is attached all these planks should look uniform.


While the planks taper at the ends, we kept the taper to a minimum to ensure that we would have room for fasteners. At the stem this is especially important since the planks will be under some pressure from the bend they're taking.


Similarly, the planks at the transom have a bit of twist to them, so maintaining enough room for fasteners is important here too.


As more battens go on, the shape of the hull starts to emerge. I think we were all a little surprised at just how shapely our little catboat is.


Once we have all the battens on, it's time to step back and make sure everything looks right.


At this point we're considering the shape of each of the planks, especially the garboard and broad strakes. The garboard is the plank next to the keel and the broads are the next two. In order for the topside planks to look uniform, the difference in girth is made up in these planks. In the case of the catboat, these planks are also forming the forefoot where the horizontal line of the keel rabbet meets the vertical line of the stem rabbet. These planks must be carefully lined out to create that transition. Remember that we've using 3/4" planking, and even with steaming there's only so much twist the red cedar will take before breaking.


At this stage we spend a lot of time looking at the plank lines and making small adjustments.


We look at the hull from every angle...


Visualizing the shape of the planks.


With a crowded shop it can be difficult to step back far enough to see the whole boat, so you improvise.


See what I mean about a shapely hull.


Too bad all that shape is going to be below the waterline.


It's important to remember too that we're building the hull upside down. So what will it look like right side up?


In the end you just have to stand back and say, "good enough." You could literally spend weeks lining out the planking if you kept fretting over little adjustments that in the end won't make any real difference. It's better to get things looking good, and call it. Otherwise you'll never get to hanging the planks.


Once we were pleased with the lines, we marked them on each of the frames, the stem, and the transom. While we've got the battens attached, we also marked with chalk anywhere on the frames that might need a little more beveling.


It's certainly been an exciting week, seeing the shape of the hull emerging. The only thing more exciting will be hanging that first plank.